Vincent Gable’s Blog

September 17, 2009

Installing Mac Apps

Filed under: Accessibility,MacOSX,Programming,Usability | , , ,
― Vincent Gable on September 17, 2009

Today’s Daringfireball article on the shortcomings of the Mac application-install procedure is worth a skim. Gruber’s suggestion that Mac OS X automatically move 3rd-party applications into the /Applications/ folder on first-run, (a la the dashboard widget install process) is a good one1. Since Mac OS X already prompts you on first run (“Are you sure you want to run a program Apple didn’t write?”) it’s hard to see any downsides to this idea.

But that’s not the behavior we have today1.

Don’t Use a Damn .dmg!

As it stands today, I don’t see a good reason to ship your apps as a .dmg. I’ve been suspicious of disk images for a few years now; and usability tests show that people get confused by them.

Distribute your application as a single .app in a .zip archive. What possible use are other files besides the application? If a “Readme” file should be read before using the application, then show it when the application is first launched.

Installers are opaque and un-Mac like. There’s always a risk that they’ll install something that breaks the computer. As a developer I am even more suspicious of installers on the Mac, because I know how broken Apple’s installer tools are.

Of course, as a developer, I know that applications do sometimes need to install components. And here the best solution is for the application to check it’s environment and ask to install missing components as needed (in essence be it’s own installer). It’s more robust, since it detects-and-corrects missing or damaged components. It always preserves the user-facing abstraction that the icon is the application.

Applications shouldn’t install hacks dangerous enough to require a bundled user-facing unisntaller. To make IMLocation work, I had to install a background process — but I made it intelligent enough that it would uninstall itself if the main application had been deleted. Yes, this is more work, but it’s worth it.


1Another idea is to make Safari and Firefox smart enough to download applications directly into the right /Applications/ folder, bypassing the usual downloads folder. This elegantly solves the instillation problem, although it creates some new problems.

2Although it would be a cool hack to write.

March 31, 2009

How To Write Cocoa Object Getters

Setters are more straightforward than getters, because you don’t need to worry about memory management.

The best practice is to let the compiler write getters for you, by using Declared Properties.

But when I have to implement a getter manually, I prefer the (to my knowledge) safest pattern,

- (TypeOfX*) x;
{
  return [[x retain] autorelease];
}

Note that by convention in Objective-C, a getter for the variable jabberwocky is simply called jabberwocky, not getJabberwocky.

Why retain Then autorelease

Basically return [[x retain] autorelease]; guarantees that what the getter returns will be valid for as long as any local objects in the code that called the the getter.

Consider,

NSString* oldName = [person name];
[person setName:@"Alice"];
NSLog(@"%@ has changed their name to Alice", oldName);

If -setName: immediately releasees the value that -name returned, oldName will be invalid when it’s used in NSLog. But if the implementation of [x name] used retain/autorelease, then oldName would still be valid, because it would not be destroyed until the autorelease pool around the NSLog was drained.

Also, autorelease pools are per thread; different threads have different autorelease pools that are drained at different times. retain/autorelease makes sure the object is on the calling thread’s pool.

If this cursory explanation isn’t enough, read Seth Willitis’ detailed explanation of retain/autorelease. I’m not going to explain it further here, because he’s done such a through job of it.

Ugly

return [[x retain] autorelease]; is more complicated, and harder to understand then a simple return x;. But sometimes that ugliness is necessary, and the best place to hide it is in a one-line getter method. It’s self documenting. And once you understand Cocoa memory management, it’s entirely clear what the method does. For me, the tiny readability cost is worth the safety guarantee.

Big

return [[x retain] autorelease]; increases peak memory pressure, because it can defer dealloc-ing unused objects until a few autorelease pools are drained. Honestly I’ve never measured memory usage, and found this to be a significant problem. It certainly could be, especially if the thing being returned is a large picture or chunk of data. But in my experience, it’s nothing to worry about for getters that return typical objects, unless there are measurements saying otherwise.

Slow

return [[x retain] autorelease]; is obviously slower then just return x;. But I doubt that optimizing an O(1) getter is going to make a significant difference to your application’s performance — especially compared to other things you could spend that time optimizing. So until I have data telling me otherwise, I don’t worry about adding an the extra method calls.

This is a Good Rule to Break

As I mentioned before, getters don’t need to worry about memory management. It could be argued that the return [[x retain] autorelease]; pattern is a premature optimization of theoretical safety at the expense of concrete performance.

Good programmers try to avoid premature optimization; so perhaps I’m wrong to follow this “safer” pattern. But until I have data showing otherwise, I like to do the safest thing.

How do you write getters, and why?

March 29, 2009

How To Write Cocoa Object Setters

There are several ways to write setters for Objective-C/Cocoa objects that work. But here are the practices I follow; to the best of my knowledge they produce the safest code.

Principle 0: Don’t Write a Setter

When possible, it’s best to write immutable objects. Generally they are safer, and easier to optimize, especially when it comes to concurrency.

By definition immutable objects have no setters, so always ask yourself if you really need a setter, before you write one, and whenever revisiting code.

I’ve removed many of my setters by making the thing they set an argument to the class’s -initWith: constructor. For example,

CustomWidget *widget = [[CustomWidget alloc] init];
[widget setController:self];

becomes,

CustomWidget *widget = [[CustomWidget alloc] initWithController:self];

This is less code, and now, widget is never in a partially-ready state with no controller.

It’s not always practical to do without setters. If an object looks like it needs a settable property, it probably does. But in my experience, questioning the assumption that a property needs to be changeable pays off consistently, if infrequently.

Principle 1: Use @synthesize

This should go without saying, but as long as I’m enumerating best-practices: if you are using Objective-C 2.0 (iPhone or Mac OS X 10.5 & up) you should use @synthesize-ed properties to implement your setters.

The obvious benefits are less code, and setters that are guaranteed to work by the compiler. A less obvious benefit is a clean, abstracted way to expose the state values of an object. Also, using properties can simplify you dealloc method.

But watch out for the a gotcha if you are using copy-assignment for an NSMutable object!

(Note: Some Cocoa programmers strongly dislike the dot-syntax that was introduced with properties and lets you say x.foo = 3; instead of [x setFoo:3];. But, you can use properties without using the dot-syntax. For the record, I think the dot syntax is an improvement. But don’t let a hatred of it it keep you from using properties.)

Principle 2: Prefer copy over retain

I covered this in detail here. In summary, use copy over retain whenever possible: copy is safer, and with most basic Foundation objects, copy is just as fast and efficient as retain.

The Preferred Pattern

When properties are unavailable, this is my “go-to” pattern:

- (void) setX:(TypeOfX*)newX;
{
  [memberVariableThatHoldsX autorelease];
  memberVariableThatHoldsX = [newX copy];
}

Sometimes I use use retain, or very rarely mutableCopy, instead of copy. But if autorelease won’t work, then I use a different pattern. I have a few reasons for writing setters this way.

Reason: Less Code

This pattern is only two lines of code, and has no conditionals. There is very little that can I can screw up when writing it. It always does the same thing, which simplifies debugging.

Reason: autorelease Defers Destruction

Using autorelease instead of release is just a little bit safer, because it does not immediately destroy the old value.

If the old value is immediately released in the setter then this code will sometimes crash,

NSString* oldName = [x name];
[x setName:@"Alice"];
NSLog(@"%@ has changed their name to Alice", oldName);

If -setName: immediately releasees the value that -name returned, oldName will be invalid when it’s used in NSLog.

But if If -setName: autorelease-ed the old value instead, this wouldn’t be a problem; oldName would still be valid until the current autorelease pool was drained.

Reason: Precedent

This is the pattern that google recommends.

When assigning a new object to a variable, one must first release the old object to avoid a memory leak. There are several “correct” ways to handle this. We’ve chosen the “autorelease then retain” approach because it’s less prone to error. Be aware in tight loops it can fill up the autorelease pool, and may be slightly less efficient, but we feel the tradeoffs are acceptable.

- (void)setFoo:(GMFoo *)aFoo {
  [foo_ autorelease];  // Won't dealloc if |foo_| == |aFoo|
  foo_ = [aFoo retain]; 
}

Backup Pattern (No autorelease)

When autorelease won’t work, my Plan-B is:

- (void) setX:(TypeOfX*)newX;
{
  id old = memberVariableThatHoldsX;
  memberVariableThatHoldsX = [newX copy];
  [old release];
}

Reason: Simple

Again, there are no conditionals in this pattern. There’s no if(oldX != newX) test for me to screw up. (Yes, I have done this. It wasn’t a hard bug to discover and fix, but it was a bug nonetheless.) When I’m debugging a problem, I know exactly what setX: did to it’s inputs, without having to know what they are.

On id old

I like naming my temporary old-value id old, because that name & type always works, and it’s short. It’s less to type, and less to think about than TypeOfX* oldX.

But I don’t think it’s necessarily the best choice for doing more to old than sending it release.

To be honest I’m still evaluating that naming practice. But so far I’ve been happy with it.

Principle 3: Only Optimize After You Measure

This is an old maxim of Computer Science, but it bears repeating.

The most common pattern for a setter feels like premature optimization:

- (void) setX:(TypeOfX*)newX;
{
  if(newX != memberVariableThatHoldsX){
    [memberVariableThatHoldsX release];
    memberVariableThatHoldsX = [newX copy];
  }
}

Testing if(newX != memberVariableThatHoldsX) can avoid an expensive copy.

But it also slows every call to setX:. if statements are more code, that takes time to execute. When the processor guesses wrong while loading instructions after the branch, if‘s become quite expensive.

To know what way is faster, you have to measure real-world conditions. Even if a copy is very slow, the conditional approach isn’t necessarily faster, unless there is code that sets a property to it’s current value. Which is kind of silly really. How often do you write code like,

[a setX:x1];
[a setX:x1]; //just to be sure!

or

[a setX:[a x]];

Does that look like code you want to optimize? (Trick question! You don’t know until you test.)

Hypocrisy!

I constantly break Principle 3 by declaring properties in iPhone code as nonatomic, since it’s the pattern Apple uses in their libraries. I assume Apple has good reason for it; and since I will need to write synchronization-code to safely use their libraries, I figure it’s not much more work to reuse the same code to protect access to my objects.

I can’t shake the feeling I’m wrong to do this. But it seems more wrong to not follow Apple’s example; they wrote the iPhone OS in the first place.

If you know a better best practice, say so!

There isn’t a way to write a setter that works optimally all the time, but there is a setter-pattern that works optimally more often then other patterns. With your help I can find it.

UPDATE 03-30-2009:

Wil Shiply disagrees. Essentially his argument is that setters are called a lot, so if they aren’t aggressive about freeing memory, you can have thousands of dead objects rotting in an autorelease pool. Plus, setters often do things like registering with the undo manager, and that’s expensive, so it’s a good idea to have conditional code that only does that when necessary.

My rebuttal is that you should optimize big programs by draining autorelease pools early anyway; and that mitigates the dead-object problem.

With complex setters I can see why it makes sense to check if you need to do something before doing it. I still prefer safer, unconditional, code as a simple first implementation. That’s why it’s my go-to pattern. But if most setters you write end up being more complex, it might be the wrong pattern.

Really you should read what Wil says, and decide for yourself. He’s got much more experience with Objective-C development then I do.

March 13, 2009

(Always) Showing a Window on Application Switch

Filed under: Cocoa,MacOSX,Objective-C,Programming | , ,
― Vincent Gable on March 13, 2009

Keith Lang said all Mac applications should show a window when you switch to them via command-tab or gestures. I agree. I do think it is best to show nothing when the last window is closed; otherwise closing a window might mean more stuff in your face, not less. But when context-switching back into an application I can’t think of a good reason why applications shouldn’t have something up that you can interact with right now.1

This is the behavior you get when switching between applications by clicking their icons in the dock. It’s unfortunate that you have to do more work for your application to behave consistently no matter how it’s switched-to. Here’s how I’ve done this in IMLocation,

In my NSApplication delegate I implemented - (void)applicationDidBecomeActive:(NSNotification *)aNotification to check if no windows were visible, and if so, put something up. Here’s the exact code I use, replace editCurrentLocation: with what’s right for you:

- (void)applicationDidBecomeActive:(NSNotification *)aNotification
{
	[self displayLocationWindowIfNoWindowIsOpen];
}
- (void) displayLocationWindowIfNoWindowIsOpen
{
	NSArray *visibleWindows = [[NSApp windows] filteredArrayUsingPredicate:[NSPredicate predicateWithFormat:@"isVisible == YES"]];
	if(IsEmpty(visibleWindows))
		[self editCurrentLocation:nil];
}


1Xcode, doesn’t put up anything when you click on it’s icon and you have turned off the “Getting Started” splash screen. This makes a bit of sense, because Xcode is a project editor, not a document editor. Projects are collections of many files, and having an “untitled” default one does not make sense. But by default Xcode shows a window, the splash screen. And there is an argument that it should show an empty file, like an Emacs “scratch buffer”.

February 11, 2009

Black on White, White on Black

Filed under: Announcement,MacOSX,Sample Code,Tips,Usability | , , , ,
― Vincent Gable on February 11, 2009

Command-Option-Control-8 will invert your screen. It’s a cool looking effect (and quite a prank if you do it to someone else’s machine), but most importantly it makes tiny-white-text-on-black webpages easier to read. Command Plus/Minus makes text larger/smaller, which helps too.

I’ve known for some time that dark text on a white background is most readable. But it until recently it was just “book learnin”. I’m young, my eyes are healthy, and I can read both color schemes just fine. I didn’t have proof I could see.

But I have trouble sleeping sometimes. A few days ago I had an “accident” with a 2L bottle of Mountain Dew and a late-night dinner of salty pizza. Look, the details of blame aren’t important here, the point is I didn’t get to sleep that night. Now, when you are very tired, it’s harder to focus your eyes — and having to focus them on a computer screen doesn’t help. About 3 in the afternoon it got downright painful to read trendy looking webpages with midnight backgrounds and petite white text. Remembering the color theory behind contrast, I gave Command-Option-Control-8 a shot, and holy shit, it worked! My screen looked like an adventure in black-lighting gone horribly wrong. But I could focus on those webpage’s text more clearly. Degraded vision from eye-fatigue gave me proof that I could see.

Now please don’t take this as anything but a biased anecdote. Trust the science, not me! But it was a neat (and painful) experience. I can see why Command-Option-Control-8 is there now. Give it a try sometime, and see if it helps for you. The most you have to lose is impressing any shoulder surfers with your computer wizardry. (Honestly though Command-Plus — make text bigger — will probably do more to enhance readability.)

Just in case you want to inver the screen programatically, this Apple Script will do the job:
tell application "System Events" to tell application processes to key code 28 using {command down, option down, control down}

February 9, 2009

Resolution Independent Screenshots

Filed under: Announcement,MacOSX,Programming | , , , ,
― Vincent Gable on February 9, 2009

Leopard includes technology that generates (mostly) resolution independent screenshots. That means when you enlarge the pictures, they won’t get pixelated, and more importantly, they will stay sharp when printed.

I don’t know if you’ve ever seen a printout of text mixed with a screenshot of text, but it looks like ass. That’s because even a very cheap printer is much higher resolution then your screen. It prints text very sharply. But when it prints the screen shot, it reproduces the low resolution display in high-fedelity — which actually makes it look worse. Plus, computers use tricks (eg sub pixel antialiasing) to make text look sharper on LCD screens — but those tricks can backfire on other media. A screenshot grabs exactly the pixels shown on the screen. And those pixels are optimized to be shown on a screen, not paper.

Example

Here’s an example screenshot (PDF). It looks like this:
Preview.png

If you open it, and zoom in, you will see that the text stays sharp, while some (but not all) of the interface gets pixelated.

PreviewBlownUp.png

How it Was Made

When Automator.app (click to open) saves a workflow, it puts a (mostly) resolution-independent screenshot of the workflow’s UI inside it. The screenshot is at SomeWorkflow.workflow/Contents/QuickLook/Preview.pdf. (In Finder, right-click a .workflow file, and choose “Show Package Contents” to look inside it).

If you print a workflow to a PDF file, it has the same limited resolution-independence. So I suspect Automator.app generates this PDF in much the same way files are printed. I have not investigated why the gray border is vectorized as well as the text. If anyone has an insight there, I’d love to hear it.

In the future, I expect text, and most UI elements, to be represented as vectors at every level of the OS. Screenshots will capture those vector-elements, as as they capture pixel-elements (pixels) today.

Now Recognizing President Barrack Abeam

Filed under: Design,Programming,Usability | , , , , , ,
― Vincent Gable on February 9, 2009

President “Barack Obama” is not recognized by my Mac’s spellchecker. Firefox, Microsoft Word1, Mac OS X — each of them has a built in spellchecker, and none of them know how to say our president’s name. Spell checker dictionaries need to be updated more frequently — to keep up with the emails we write.

Things have improved since 1995, but there’s still a long way to go.

There’s more to say about how to fix things, but someone has already said it. The future looks bright,

(Microsoft) now scans through trillions of words, including anonymized text from Hotmail messages, in the hunt for dictionary candidates. On top of this, they monitor words that people manually instruct Word to recognize. “It’s becoming rarer and rarer that anything that comes to us ad hoc isn’t already on our list” from Hotmail or user data, Calcagno says. According to a July 14, 2006, bug report, for example, the Natural Language Group harvested the following words that had appeared more than 10 times in Hotmail user dictionaries: Netflix, Radiohead, Lipitor, glucosamine, waitressing, taekwondo, and all-nighter.

I think the next step in spellchecking is to follow Mac OS X’s lead, and adopt a system-wide spellchecker. When there’s only one instance of a spellchecker running (not a separate one for every program that might work with text) we can make it much smarter, without requiring a supercomputer.


1


Microsoft added Barack and Obama to Office’s dictionary back in April 2007, but unfortunately, that change hasn’t yet made it to the Mac Ghetto, ahem, “Mac BU”. Or at least I haven’t seen it in Word yet.

December 31, 2008

Mac OS X Redesign: Feedback for “Hold Keys”

Filed under: Design,MacOSX,Usability | , , , ,
― Vincent Gable on December 31, 2008

To prevent particularly bad slips (physical, not cognitive, mistakes), Apple makes certain keys hold keys. That means you have to hold them down for a while before they do their thing, unlike any other button that you just tap to use. This prevents accidentally engaging the hold keys, because a quick tap isn’t enough to trigger them. Unfortunately, it causes major problems for users. Apple could fix things by simply adding 3 words to the key-pressed-indicators they already use, and displaying it immediately.

The eject key is a hold key on MacOSX 10.4.9+. It’s a pretty bad thing to accidentally activate, because it takes several seconds to put a physical disk back into a tiny slot . By comparison the most common slips (typos), can be corrected in a split-second with 2 keystrokes(delete + the right letter). The eject key is located just above the delete key (which behaves like backspace on other computers), and right next to F12, which by default is mapped to Dashboard. Both of these keys are relatively high traffic, so it’s a sure bet that many a slipped finger will tap the eject-key. Making the eject-key a hold key prevents accidental taps, because a tap isn’t enough to trigger it.

caps lock on new keyboards is a hold key to turn on (but not off). Anything that makes caps lock harder to engage is great, since there’s no good reason to have a caps lock key anyway.

But there is a big problem with what Apple has done here. There isn’t any indication that hold keys are special. Worse, if you try to use one the way you use every other button on the keyboard, mouse, or computer — by tapping them – nothing happens. It’s like the hold keys are broken. here’s a video showing how confusing the eject key is.

One of the first things I noticed after updating Mac OS X Tiger to 10.4.9 was that my CD eject key didn’t seem to work anymore

Unfortunatly, that is a common reaction.

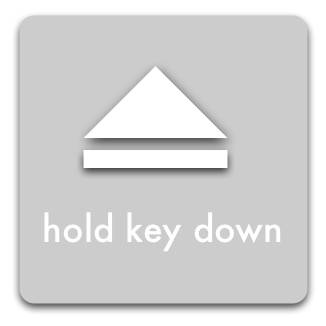
All hold keys should give immediate feedback when tapped, and also indicate that they need to be held down to trigger their action. Macs already flash an translucent eject indicator when the eject key’s action is performed:

Media Eject Symbol

Immediately displaying the following indicator, and pulsing the symbol when the action is triggered does everything we need:

Media Eject Symbol + 'hold key down' message

This is just a quick mock-up to get the idea across, it has a lot of flaws.

Unlike the eject symbol, the text has no drop shadow — this makes it less busy, and easier to read; but arguably unaesthetic.

The text is in all lowercase, because all words on Apple keyboards are in all lowercase. The idea is that it more closely associates the instructions with the keyboard. It’s probably a mistake, since it does not follow the capitalization rules for Mac OS X, but it made sense to me at the time.

The text also should have a stronger border, so it will show up clearly no matter what it is displayed over. And it should be bigger. And in a better font.

But hopefully this is enough to get my idea across.

July 3, 2008

NSApplicationName Inconsistencies

Filed under: Bug Bite,Cocoa,MacOSX,Objective-C,Programming,Sample Code | , , ,
― Vincent Gable on July 3, 2008

The value stored under the NSApplicationName key of the result of [[NSWorkspace sharedWorkspace] activeApplication] is not the always the name the user knows the application by. Worse, it’s not always the same as the name for the application that other APIs expect or return. Even fullPathForApplication: in NSWorkspace sometimes won’t recognize it!

The problem stems from the fact that there are at least five application names floating around, at least in concept: (1) the file name the Finder sees, which in the case of an application package is the package (bundle) name; (2) the name of the executable inside the package, (3) the long name used in many places for display purposes only; (4) the short name used as the application menu title and in a few other places where a long name won’t fit for display purposes; and (5) the process name of a running application. They aren’t always the same, especially in Microsoft and Adobe products.

–From an informative message by Bill Cheeseman.

So instead of relying on NSApplicationName I now use -[[NSFileManager defaultManager] displayNameAtPath:] then strip off the filename extension. This should give exactly the filename the user sees. Every time.


NSDictionary *appInfo = [[NSWorkspace sharedWorkspace] activeApplication];
NSString *appPath = [appInfo objectForKey:@"NSApplicationPath"];
NSString *name = [[[NSFileManager defaultManager] displayNameAtPath:appPath] stringByDeletingPathExtension];

And of course, you really should be using bundle identifiers, instead of names, to identify an application. Unfortunately, a very few applications are not bundles. (For example, Microsoft stuff prior to Office 2008), so it might be necessary to fall back on using a name to locate them in a path-independent way.

Creating a custom CFBundleName in an application’s info.plist file seems to confuse NSApplicationName. For this reason I don’t think setting it is a good idea.

UPDATE 2010-01-20: See also, Technical Q&A QA1544: Obtaining the localized application name in Cocoa

May 4, 2008

Getting Mac OS X Version Information

Filed under: MacOSX,Objective-C,Programming,Sample Code,UNIX | , ,
― Vincent Gable on May 4, 2008

Cocoa

For a human-readable string, use [[NSProcessInfo processInfo] operatingSystemVersionString]. It looks like “Version 10.5 (Build 9A581)”, but that format might change in the future. NSProcessInfo.h explicitly warns against using it for parsing. It will always be human-readable though.

For machine-friendly numbers, use the Gestalt function, with one of the selectors:
gestaltSystemVersionMajor (in 10.4.17 this would be the decimal value 10)
gestaltSystemVersionMinor (in 10.4.17 this would be the decimal value 4)
gestaltSystemVersionBugFix (in 10.4.17 this would be the decimal value 17)
Do not use gestaltSystemVersion unless your code needs to run on OS X 10.2 or earlier. It’s a legacy function that can’t report minor/bugfix versions > 9; meaning it can’t distinguish between 10.4.9 and 10.4.11. The CocoaDev wiki has example code that works in 10.0 if you need to go that route.

Here’s a simpler example of using Gestalt:

- (BOOL) usingLeopard {
  long minorVersion, majorVersion;
  Gestalt(gestaltSystemVersionMajor, &majorVersion);
  Gestalt(gestaltSystemVersionMinor, &minorVersion);
  return majorVersion == 10 && minorVersion == 5;
}

Scripts

For scripts and command-line work, there is the sw_vers command.
$ sw_vers
ProductName: Mac OS X
ProductVersion: 10.5
BuildVersion: 9A581
$ sw_vers -productName
Mac OS X
$ sw_vers -productVersion
10.5
$ sw_vers -buildVersion
9A581

Java

Check the value of:

System.getProperty("os.name");
System.getProperty("os.version");

Fallback

Finally, if you must, you can parse /System/Library/CoreServices/SystemVersion.plist — but I don’t like the idea of doing that. There’s a chance that the file could have been corrupted or maliciously altered. It seems safer, and less complicated, to directly ask the operating system it’s version.

Minimum OS Requirements

To enforce a minimum OS requirement for your application, you can set the LSMinimumSystemVersion key in the Info.plist file. Big Nerd Ranch has a more robust, user-friendly, but complicated solution for older legacy systems.

Powered by WordPress